

The Facebook pixel is a piece of code that is placed on your website and allows you to measure the effectiveness of your ads by analyzing the actions of your website’s visitors.
It is no secret that the Facebook pixel is a must-have if you intend to run and optimize your Facebook ads. However, some of us understand how it works while others do not. Understanding the Facebook pixel will not only help you install it on your website, but it will also help you use it once it is installed.
This post will explain what a Facebook pixel is and how you can implement and use it effectively and easily on your website.
What is Facebook Pixel?
The Facebook Pixel is used to gather vital information about your target audience. The code you insert into your website extracts data from your visitors for you to analyze. You can use that data to create better Facebook ads and target them more precisely.
The tracking pixel ensures that your Facebook ads are only shown to people who are interested in your content and are likely to convert. This ultimately aids in the improvement of your conversion rate.
Even if you aren’t currently using Facebook ads, you should still install the Facebook Pixel. I recommend that you start using Facebook Pixel right away. Pixel will have built a large enough relevant audience by the time you decide to run Facebook ads, allowing you to target your ads more effectively.
Facebook Pixel tracks cross-device conversions as well. It enables users to see how their visitors move from one device to another as they convert. You can also use Facebook Pixel to create a ‘lookalike audience.’ A lookalike audience is someone who shares your original audience’s interests.
In a nutshell, Facebook Pixel gives you the audience insights you need. It tells you why and how people are visiting your WordPress website. This is crucial information that will assist you in creating effective Facebook ads.
5 Best Free Facebook Pixel Plugins for WordPress
1. PixelYourSite – Your smart PIXEL (TAG) Manager
PixelYourSite is a freemium plugin that allows you to integrate the Facebook pixel into your website. You can easily install the code with just a few clicks using this plugin.
Furthermore, you can use this plugin to fire your own custom events without any coding knowledge. It fully supports both the WooCommerce and Easy Digital Downloads plugins, which is fantastic. Because both of these plugins are the most widely used methods for creating digital or physical e-commerce sites.
The plugin also includes pro features. This starts at $150 for a single website. You get a full set of features with the pro versions that you may not have gotten with the free version.
2. Pixel Caffeine
Pixel Caffeine is another popular Facebook pixel management app. Because the plugin is from AdEspresso, a certified Facebook Marketing Planner, you can rely on it and use it with confidence.
Using this plugin, you can easily implement the Facebook pixel on your website, track conversions, and start creating custom audiences, events, and more. According to the developer, the plugin is completely free to use and has no hidden costs.
There are numerous reasons to consider using this plugin. First and foremost, it is completely free; second, installation is quick and requires no coding; and third, you can easily track visitors based on their viewed products, categories, and tags and later target them with retargeting ads.
Furthermore, you can easily create a product catalog for Facebook and keep it constantly synced. Moreover, with advanced options, you can sync the product catalog that you want to promote to Facebook.
3. Pixel Cat – Conversion Pixel Manager
Another better option for adding Facebook Pixel to your WordPress website is the Pixel Cat plugin. This simplifies the process of adding the pixel to your website. The pixel will allow you to target specific audiences for your Facebook campaigns and track whether or not they converted after seeing your ad.
Pixel Cat – Conversion Pixel Manager was previously known as “Facebook Conversion Pixel.” The plugin sends you events like post reads, product views, and more, allowing you to create effective retargeting ad campaigns.
The plugin provides numerous event, segmentation, and customization options, making it one of the best options.
4. Insert Headers and Footers by WPBeginner

Insert Headers and Footers by WPBeignner is yet another simple and popular option for integrating the Facebook Pixel code into your website.
It makes it very easy to do so. You simply copy the Pixel Code and choose whether to place it in the Header, Body, or Footer. You can not only insert Facebook Pixels but also any code or scripts into these fields without editing the theme files. As a result, it’s both fantastic and user-friendly.
5. Tag Manager – Header, Body And Footer

Another plugin that allows you to insert Facebook Pixel code into your website is Tag Manager. This plugin’s interface is similar to that of the previously mentioned Insert Headers and Footers by WPBeginner plugin. This is yet another simple plugin for adding Facebook Pixel to your website. Furthermore, the plugin is free to use.
It allows you to insert code into the header section, after the start body tag, and above the ending body tag in the footer. This plugin allows you to insert code and snippets into your website for services such as Google Tag Manager, Google Analytics, Facebook Pixel, Google Adsense, and many more.
How do you manually integrate the Facebook Pixel into your website?
You can add Facebook Pixel on your website manually too. For doing this first you need to create your Facebook Pixel ID from Facebook Ads Manager.
- Go to Events Manager.
- Click
Connect data sources and select Web.
- Select Facebook pixel and click Connect.
- Add your pixel name.
- Enter your website URL to check for easy setup options.
- Click Continue.
Once you have the Facebook Pixel, next you need to add it to your website.
- Go to Events Manager.
- Select the pixel you want to set up.
- Click Continue pixel setup.
- Select Install code manually.
- Copy the pixel base code.
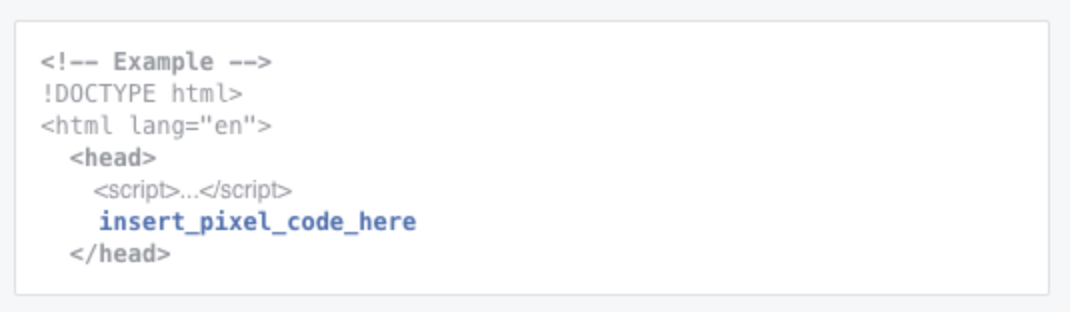
- Find the header of your WordPress website or locate the header template.
- Paste the base code at the bottom of the header section, just above the closing head tag (</head>).
- Click Continue.
- Optional: Toggle on Automatic advanced matching and verify the customer information that you want to send.
- Click Continue.
- Add events using the Event setup tool or by manually adding code to your website.
Conclusion
Using any of the plugins, you will be able to quickly and easily add the Facebook Pixel to your site. In this post, we discussed the Facebook pixel, how it can benefit your business, and how to incorporate it into your website using plugins or manually.
Please contact us via our social media channels if you have any questions or suggestions. If you enjoyed the post, please share it on your social media channels. For updates, guides, and more, like our Facebook page, follow us on Twitter, and subscribe to our YouTube channel.
You may also like:
Top 7 Email Customizer Plugins for Woocommerce You Can’t-Miss