The Facebook Pixel for WordPress is essential for businesses using WordPress that want to maximize their online advertising. By adding this handy tracking code to their WordPress sites, companies can tap into important insights about how users behave and how well their ads are doing.
Setting up the Meta Pixel on your WordPress site lets you keep tabs on how users are interacting with your content. It helps you see how well your Facebook ads are performing and fine-tune your marketing tactics for better results. This guide will take you through the easy steps to add the Facebook Pixel to your WordPress website, so you can really make the most of it and boost your conversions to hit those marketing goals.
If you’re running a website, doing marketing, or managing a business and want to boost your online presence and conversion rates, getting the hang of setting up the Facebook Pixel on your WordPress site is super important. In this post, we’ll check out different ways to integrate the pixel, tackle some common issues, and go over the perks of using this awesome tool to level up your advertising game.
What is the Facebook Pixel?
The Facebook Pixel, now called the Meta Pixel, is a little piece of code that website owners can stick on their sites to keep track of how users interact with them and how many conversions they get. This handy tool gives businesses some great insights into how well their Facebook ads are working, helping them make smart, data-driven choices and fine-tune their marketing strategies.
By installing the Meta Pixel on a WordPress site, companies can:
- Track user behavior: The pixel records user interactions, such as page views, add-to-cart actions, and purchases, providing a comprehensive understanding of how visitors engage with the website.
- Measure ad performance: Businesses can assess the impact of their Facebook ads by tracking conversions and attributing them to specific campaigns, ad sets, and ads.
- Create custom audiences: The data collected by the pixel allows marketers to build targeted audiences based on user behavior, enabling them to deliver more relevant ads and improve their return on ad spend (ROAS).
- Optimize ad delivery: The Meta Pixel helps Facebook’s advertising system optimize ad delivery by identifying the most responsive audiences and adjusting bids accordingly, ultimately reducing costs and increasing conversions.
Setting up the Facebook Pixel on your WordPress site is pretty easy, and you’ve got a couple of options to do it. You can either grab a dedicated plugin, or you can just add the pixel code straight to your site’s header.
How to Add Facebook Pixel to WordPress
Embedding the Facebook Pixel into your WordPress website involves a carefully planned approach designed to enhance your analytics capabilities. The first step involves determining the best method of installation based on your technical comfort level. Whether utilizing a plugin or opting for manual code insertion, each method ensures seamless integration for optimal data collection.
Step 1: Install a Facebook Pixel Plugin
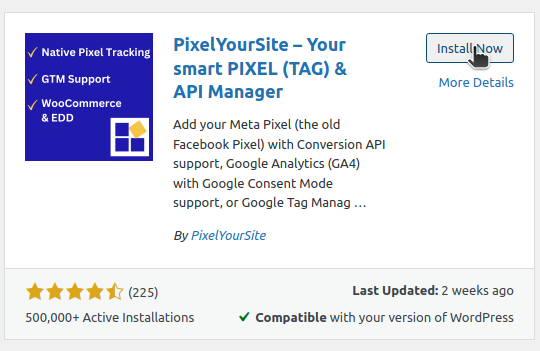
Begin your journey to integrate the Meta Pixel into your WordPress setup by selecting a plugin that simplifies the installation process. Opting for the “PixelYourSite” plugin ensures a streamlined experience, allowing for efficient data capture and continued adaptability to web advancements, all without the need for intricate coding.
Explore our blog post to find a variety of plugins for integrating Meta Pixel into your WordPress site. Take some time to review the options available, and select the one that best meets your needs. Since these plugins are free, you can experiment with them to discover the perfect fit for your site.
Navigating the Plugin Installation
Your WordPress dashboard is the launchpad for embedding the Facebook Pixel through a plugin. To get started:
- Explore the Plugins Interface: Within your WordPress dashboard, head to the ‘Plugins‘ section.
- Initiate a Plugin Search: Type ‘PixelYourSite‘ into the search field.
- Execute the Installation: Select ‘Install Now‘ for the chosen plugin, which initiates the download and readies it for further configuration.

Activation and Initial Configuration
Following the installation, the pivotal phase involves bringing the plugin to life to kickstart its tracking features. Here’s what to do next:
- Enable the Plugin: After installation, ensure you activate it. This action transitions the plugin from inactive to active, allowing it to begin gathering essential interaction data.
- Review Plugin Setup: Once activated, a quick check of the initial settings aligns the plugin’s functionalities with your specific tracking objectives, setting the stage for comprehensive data collection.
Step 2: Configure the Plugin Settings
After the Meta Pixel plugin is installed and activated, configuring its settings is essential to ensure your website interfaces correctly with Facebook’s analytics system.
Initiating Plugin Configuration
Start by diving into the plugin’s settings area, where you can fine-tune how your site interacts with the pixel. Here’s how to proceed:
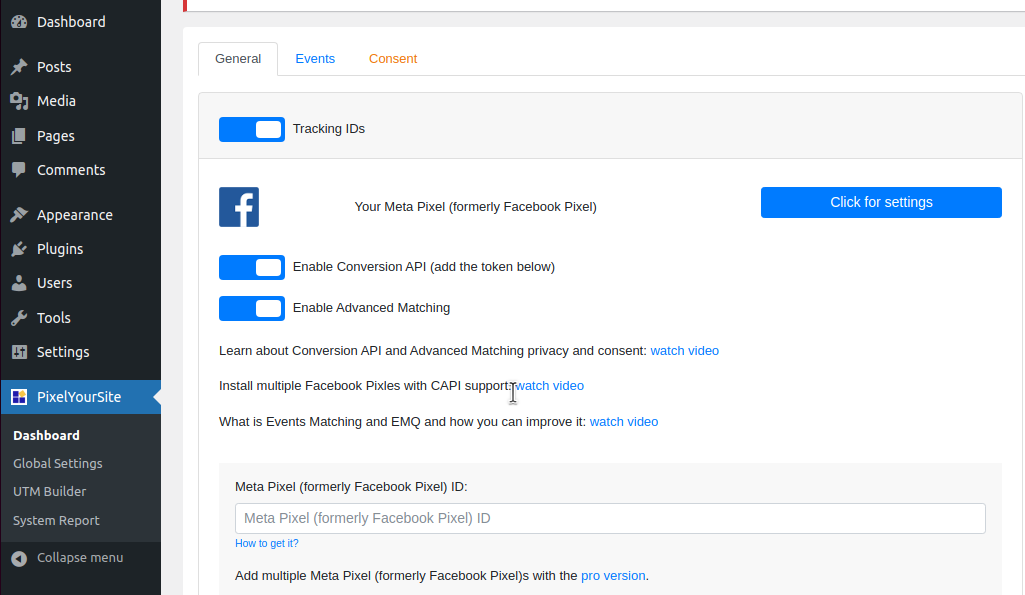
- Access the Plugin Dashboard: Begin by clicking on the PixelYourSite from the sidepanel of your WordPress menu. Then after landing on the dashboard, in the Meta Pixel, Click for settings button.

- Enter your Meta Pixel and Enable necessary settings: Then enable the necessary settings and add your Meta Pixel ID below. You can directly access your pixel id using this link: https://www.facebook.com/ads/manager/pixel/facebook_pixel
Securing the Data Transfer
Ensuring that the data connection remains secure and reliable is critical. During this stage:
- Validate the Access Token: It’s imperative to confirm that the access token is properly configured for secure data exchanges.
- Review Data Permissions: Double-check the permissions granted to the plugin. This ensures the plugin collects comprehensive interaction data while respecting privacy standards.
By meticulously setting up these configurations, you enable the Meta Pixel to function optimally, providing valuable insights that can inform future marketing strategies without compromising data security.
Step 3: Manual Installation without a Plugin
Manual installation of the Facebook Pixel offers a customized solution. This approach enables customization and precision in integrating the pixel, aligning with unique business objectives and technical setups.
Preparing for Manual Installation
To facilitate a seamless manual setup, initiate the process with these foundational steps:
- Visit Facebook’s Ads Manager: Log in and navigate to the Ads Manager, where you can manage your Meta Pixel.
- Generate the Pixel Code: Within the Ads Manager, create and copy the pixel code specific to your website. Or, you can directly access your Meta Pixel ID from this link: https://www.facebook.com/ads/manager/pixel/facebook_pixel
These steps ensure that you have the tailored pixel code ready for integration into your WordPress theme.
Embedding the Pixel Code
With the pixel code in hand, the next phase involves embedding it into your WordPress site’s framework. Here’s how to proceed:
- Access Theme Files: Within your WordPress dashboard, navigate to ‘Appearance’ and then to the ‘Theme File Editor‘. This section allows for direct editing of your theme’s core files.
- Locate the Header Section: Find the
header.phpfile, which contains the HTML header structure for your site. Editing this file allows the pixel to activate upon every page load. - Integrate the Pixel Code: Insert the pixel code into the header section, ensuring it is positioned strategically for optimal data capture and performance. The pixel code is located in the Data Sources section of your Facebook account. To connect a new website using the pixel, select the manual option. This will provide you with a code to paste into your website’s header section.
Step 4: Verify Pixel Installation
Verification of the Facebook Pixel installation is crucial to ensure accurate data collection and operational efficiency.
Deploying Diagnostic Tools
To ascertain the pixel’s proper deployment, utilize diagnostic tools designed for comprehensive analysis:
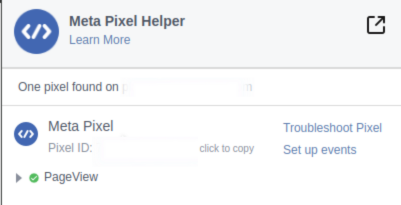
- Install Diagnostic Utilities: Incorporate tools like browser-based extensions such as Meta Pixel Helper that provide detailed feedback on the pixel’s status, helping identify potential issues that might affect data accuracy.
- Analyze Web Pages: With the diagnostic tool active, visit your website to review the feedback provided. Look for confirmation signals indicating successful tracking, and investigate any alerts that suggest misconfigurations.

Inspecting Activity Through Platform Tools
Beyond initial diagnostics, delve into the platform’s native tools to monitor the pixel’s activity:
- Navigate to Platform Analytics: Access the analytics section associated with your pixel to review comprehensive interaction data.
- Scrutinize Interaction Logs: Examine the event logs for consistency with your expected data flow. Confirm that critical interactions, such as conversions and user engagements, are recorded accurately and reflect real-time activity.
By employing these strategies, businesses can verify that their pixel setup functions optimally, delivering reliable insights that drive informed decision-making.
Step 5: Leverage Advanced Features
To unlock the full potential of the Facebook Pixel, businesses should explore its advanced features, offering a strategic edge in optimizing digital marketing performance. By integrating sophisticated data-sharing techniques, you create a robust connection between your site. And Facebook’s ecosystem, ensuring a seamless flow of accurate data even when facing traditional tracking limitations.
Utilizing Enhanced Data Sharing
Beyond the basic capabilities of the Facebook Pixel, enhanced data-sharing techniques can elevate your tracking precision:
- Implement Direct Data Channels: Establish a server-to-server communication pathway, ensuring uninterrupted data transmission. This method bypasses conventional tracking barriers, maintaining comprehensive insight into user interactions and supporting strategic decision-making.
- Optimize Data Integrity: By employing these advanced techniques, you ensure your analytics reflect genuine user engagement, providing a solid foundation for evaluating campaign effectiveness and adjusting strategies accordingly.
Engaging in Personalized Campaign Strategies
Leveraging the pixel’s data capabilities allows for the creation of personalized marketing strategies that resonate with specific audience segments:
- Craft Tailored Audience Segments: Analyze interaction data to build detailed audience profiles based on their engagement patterns. This segmentation facilitates the delivery of highly targeted advertising, enhancing user relevance and engagement.
- Design Adaptive Marketing Efforts: Implement adaptive advertising campaigns that respond to real-time user behavior insights, ensuring content remains relevant and appealing to your audience.
These advanced features not only improve your site’s data collection capabilities but also empower your marketing strategies with precise targeting and actionable insights, enhancing your competitive position in the digital marketplace.
Frequently Asked Questions (FAQs)
1. What are the benefits of using Facebook Pixel on my WordPress site?
Using the Facebook Pixel on your WordPress site opens up a whole new world of analytics that can change the game for digital marketing. The pixel helps you gather useful data that makes it easier to segment your audience, so you can run super personalized ads that connect with potential customers. This approach not only boosts user engagement but also makes your marketing budget go further, leading to better conversion rates and more profits.
Plus, the pixel gives you great insights into the customer journey, from the first contact to the final purchase. With this knowledge, businesses can fine-tune every touchpoint, creating a smoother experience for users and keeping them satisfied. By tailoring marketing efforts to how users behave, companies can roll out campaigns that hit home and make a real impact.
2. How do I troubleshoot Facebook Pixel issues on WordPress?
When you’re having trouble with the Facebook Pixel, it’s important to tackle it systematically. Start by checking how the pixel is integrated into your site—make sure the code is properly added to the theme files or set up correctly with your plugin. This simple check often clears up common issues that can mess with data collection.
Also, take a look at your website for any plugin conflicts that might be causing problems with the pixel. Sometimes, other plugins can accidentally block the pixel from collecting data. By figuring out and fixing these conflicts, you can help the pixel work smoothly, keeping your analytics accurate and reliable.
3. Can I install Facebook Pixel on WordPress without a plugin?
You can install the Facebook Pixel, or Meta Pixel, on WordPress without a plugin. If you want a more customized setup, doing it manually gives you complete control over where it goes. This means you can directly add the Pixel code to your site’s header, making sure it fits perfectly with how your site is structured and captures all the important data.
This hands-on method is great for those who are comfortable with some coding and want to set things up just right. It allows for a personalized setup that boosts your data collection and helps with your marketing efforts. Plus, doing it manually gives you the flexibility to tweak the Pixel to fit your business needs, ensuring that you track everything important across your digital landscape.
4. How do I add social media tracking pixels?
To improve your website’s tracking capabilities, consider integrating various social media tracking pixels in addition to Facebook. Using a tag management system can simplify this process, allowing for the easy incorporation of tracking scripts from multiple platforms. This unified approach ensures consistent data collection and provides a comprehensive view of user interactions across different platforms.
By implementing a thorough tracking strategy, businesses can gain valuable insights into user behavior across various social media channels.
Conclusion
Implementing the Facebook Pixel on your WordPress site is a game-changer for businesses looking to optimize their digital marketing efforts.
By harnessing the power of this tool, you can unlock valuable insights into user behavior, refine your targeting strategies, and drive better results from your advertising campaigns.
If you’re ready to take your online presence to the next level, explore our services and let us help you achieve your marketing goals.


