

Menu Bar

Checkout the complete WP Paint Playlist here.
Edit
- Undo: If you have made any changes that you don’t like, you can use the Undo option to go back to the previous version of the image.
- Delete selection: You can choose this option to delete any selection you have made using a selection tool.
- Copy selection: Copy selected items using this option.
- Paste: Paste the copied selection using this option.
- Select all: Use this option to select every element of the canvas.
Image
- Information: Get image width, height, pixels, layers and unique colors information by choosing this option.
- Size: Change the canvas size.
- Trim: Trim layers, borders and white colors when these options are selected.
- Zoom: You can zoom in, zoom out of the canvas. Also, you can make the canvas fit to your window size, or you can choose to fit to the original size.
- Resize: You can resize the image as per your requirement.
- Rotate: Rotate option is also available to help you easily rotate images.
- Flip: Flip image sides.
- Translate: Change the position of the selected element.
- Opacity: Control the opacity of images using this feature.
Layers
- New: Creates a new layer. You can also use the ‘n’ key on your keyboard to create a new layer.
- New from selection: You can create a new layer using this option, if you have already selected any image or part of an image using the selection tool.
- Duplicate: You can create a duplicate layer using this option.
- Show / Hide: Show or Hide any layer using this option.
- Delete: It deletes any layer that is selected.
- Convert to raster: Converts an image into raster (bits of map or grid of pixels or dots) image.
- Move: Use this option to move up or down the layers.
- Rename: Rename any layer for better understanding or identification.
- Clear: This option will remove the selected image or object, However, it will not remove the layer.
- Difference Down: It will show the differences between the two layers and create a third layer.
- Merge Down: If you want to merge two layers then select the second layer and choose this option to work. It will merge two layers together. You can not merge more than two layers at the same time.
- Flatten Image: This option will merge all of the layers at the same time.
Tools
- Borders: You can add borders to your image using this option. In addition, you can give your border different colours, add a shadow effect, and customise the border size as required.
- Color/Lighting: Using this option you can control the brightness and contrast of your images.
Help
- Keyboard Shortcuts: You can learn about the keyboard shortcuts that WP Paint and WP Paint Pro support. You can learn various shortcuts from this, for example, press the ‘s’ key to save and download the image. ‘F9’ to quick save your image etc.
- Report issues: This will open our WP Paint support forum in WordPress, where you will find various issues that we’ve sorted out, and you can also create a new topic if your query is new.
- Like Us: If you like our plugins and are happy with our services, you can motivate us to give an excellent WordPress review.
- About WP Paint: Learn more about WP Paint, its version, author, website, and some more details in this window.
- Upgrade to Pro: You can choose this link to Upgrade to the Pro version of the WP Paint, which offers more advanced features.
Tools Panel
There are several useful tools available in this panel that you can use to edit your images. Learn more about the tools below.

- Select object tool: If there is an object on your canvas, you can use this tool to move its position, or change its size.
- Selection: Use this tool to select any part of your image and then use it to copy or delete it.
- Brush: You can add some extra colours to your images using this tool. It lets you control the size of the brush, and you can also use the smart brush option, which changes the size of the brush based on the speed of the cursor.
- Pencil: You can use the pencil tool to draw designs on your images. You can also enable or disable the Antialiasing effect. If this is enabled, you can control the size of the pencil.
- Pick Color: This tool will help you pick the color of any area in your image.
- Erase: Use this tool to erase any part of your image. You can also choose the size of the erase tool, and choose the type of the erase tool between circle and square.
- Magic Wand Tool: The Magic Wand Tool allows the selection of areas with similar colours. A single continuous shape or multiple distinct areas may be the region to be selected.
- Fill: It’s a single click colour replacement tool for any object. Just click on an object, convert it to a raster, and then choose the Fill tool and the colour you want to give. Clicking on the object will change the colour.
- Line: Adds a line shape on to your image.
- Rectangle: Adds a rectangle shape to your image.
- Circle: It adds a circle shape to your image.
- Text: You can add text to your image. In addition, you can control the size of the text, font, make it bold or italic, align it, give it a stroke effect and control the size of the stroke.
- Gradient: Use this tool to apply gradient colors (mix of two colors) overlay to your image. You can also control the alpha level, apply the radial shape gradient, and control the radial power.
- Crop: Remove the unwanted part of your image using the Crop tool.
- Blur: Use the Blur tool to apply blur in your images. You can control the blur circle size and its power as well.
- Sharpen: Using this tool, you can sharpen any area of the image. You can also control the size of the sharpen tool.
- Desaturate: You can use the Desaturate tool to remove colors from any part of your image. It will make the part black and white. Moreover, you can control the size of the tool and enable or disable the Anti aliasing option.
- Bulge/Pinch Tool: Using this tool you can distorts any part of the image. You can also control the radius and power of the tool.
Right Side Panel
The right side panel consists of Preview, Colors, Information, Layer Details and Layers. You will also learn more about these below.
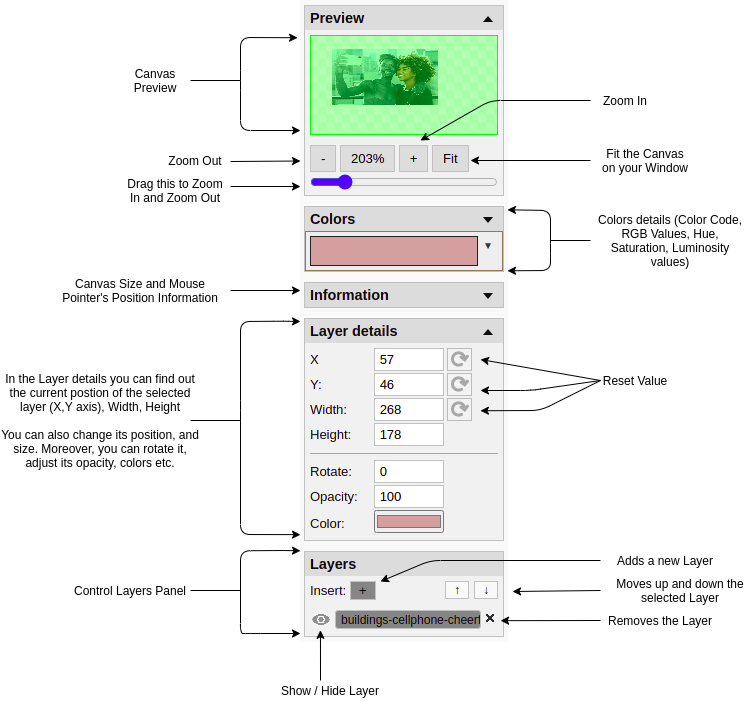
- Preview: You can see a preview of the canvas in this panel. You can also zoom in or zoom out the canvas using the ‘-‘ and ‘+’ buttons. Other ways to zoom in and zoom out of the canvas are by using the drag option given below in that panel or using the scroll wheel of your mouse.
- Colors: In this section of the panel, you will get all the color information, if you have picked any color using the Pick Color tool. It shows color’s hex code, RGB and alpha values, and also the Hue, Saturation and Luminance levels of the colors.
- Information: Here it shows the canvas size and also mouse pointer’s position.
- Layer details: All the information on the selected layer can be found in this section. And you can learn about the position, height and width of the layer. You can also control the position, height, width, rotation, opacity and colour of the layer, etc. If it’s a text layer, then you’ll get a few more options like Edit Text, Bold, Italic, Stroke, Size, Alignment, Font, etc.
- Layers: Here you can see all the layers, add or remove layers, move up and down the layers, also show or hide the visibility of the layers.